 |
 |
 |
 |
 |
|
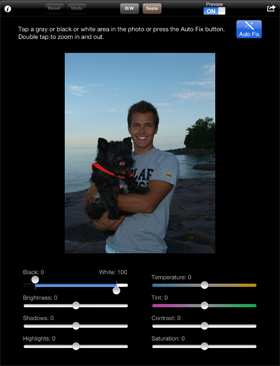
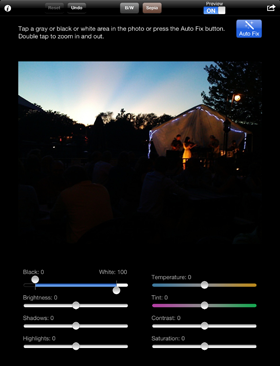
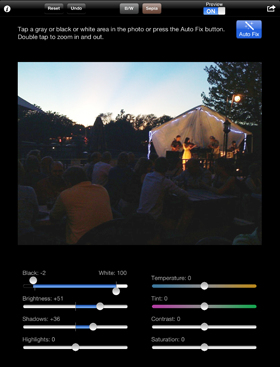
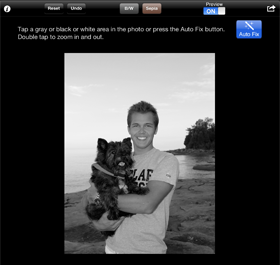
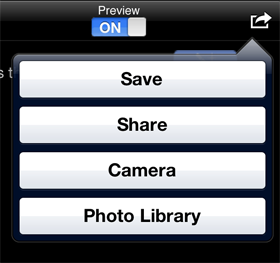
You won't find a color correction tool that is easier to use than iCorrect® OneClick Color. Here are some tips to help you get started, followed by detailed descriptions of each control. Getting Started: Select a photo or take a new one, and then for an instant correction, just tap someplace in your photo that should be gray, black or white. If there isn't anyplace like that, use the Auto Fix button. It's worth taking the time to read the built in instructions. Tap the i in the toolbar to view them. Zoom in and out by double tapping the image. You can tap more than one area in the image, and you'll get the best results if you choose both dark and light gray colors. You can fine tune the color correction, or create special effects, by adjusting the sliders. Note that some of the sliders are set by the automatic correction, so do the automatic correction first, then adjust the sliders. It is best to use the sliders in the order they are listed. For example, adjust the black and white points before you adjust the brightness. You can easily compare the original photo with the corrected photo by turning the Preview switch off and on. You can start over at any time by tapping the Reset button. Color Balance and Automatic Correction If the photo has any areas that should be neutral (gray, white, or black - not beige, ivory, etc.), tap the photo in one of those areas. If the area is too small to easily tap with your fingertip, double tap first to zoom in. You can repeat this process, tapping multiple areas at different lightness levels for the best results.
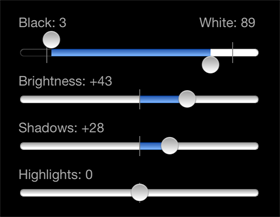
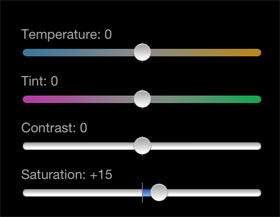
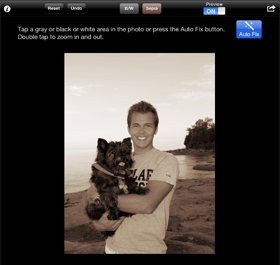
Sliders Use the sliders to fine tune the automatic correction or to create special effects. The black and white point sliders control the lightness range. Set the black point below zero for less black (making dark colors lighter) and above zero for more black (making dark colors darker). Set the white point above 100 for less white (making light colors darker) and less than 100 for more white (making light colors lighter). Use the brightness slider to adjust the overall brightness, the shadow slider to adjust the brightness of the shadows, and the highlight slider to adjust the brightness of the highlights. You can adjust the overall color balance of the image with the temperature and tint sliders. Use the temperature slider to make the image warmer (more orange) or cooler (more blue). The tint slider can be helpful correcting skin tones (like a TV tint control), adding magenta or green to the image. The contrast slider adjusts overall contrast and the saturation slider adjusts the vividness of colors. You may adjust only one or two sliders, or all of them, but it is best to use them in the order they are listed. So, for example, set the black and white points before you set the brightness. Also note that some of the sliders are set by the automatic correction. You can adjust them, but if you follow with another automatic correction, your slider settings will be overridden. Toolbar You can tap the Reset button at any time to restore the original image and start over. Use the Undo button to undo the most recent correction. To convert to a black and white (grayscale) image, tap the B/W button, or convert to a sepia tone with the Sepia button.
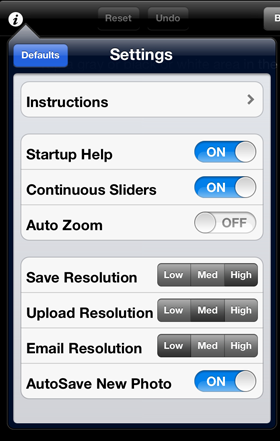
Instructions displays the instructions you are currently viewing. When Startup Tips are on, a helpful tip will be displayed each time you launch the app. All the tips are listed here. When Continuous Sliders is on, the image is continuously updated to reflect the current slider setting. You can turn this switch off if you prefer more responsive sliders, however, the image will not be updated until you release the slider. If you find that you almost always need to zoom in for precision, you can turn Auto Zoom on. Then when you tap on an unzoomed image, it will zoom in, and the next tap (which should be on a grayish color) will both correct the color balance and unzoom. If you use iCorrect on both iPhone and iPad, you may want to turn this mode on so that the two apps function the same way. (Zooming is almost always necessary on the iPhone as the image display is smaller than on the iPad, so on the iPhone, auto zoom is the default). To maintain your original image resolution, choose High. Higher resolution images take longer to save, longer to email, longer to upload, and use more space on your device, so don't save or share more than you need. Medium resolution is half the original resolution, and Low resolution is 640 x 640 or less, depending on the aspect ratio of your image. When sharing, note that the service or app that you share with may also scale your image to conform to its resolution requirements. When AutoSave New Photo is on, the original, uncorrected version of photos that you shoot in iCorrect will be automatically saved as soon as you take them. Please visit the iCorrect® OneClick Color website, (http://www.oneclickcolor.com) for information on other OneClick™ Color products and technology. |
 |
 | |
 | |
 | |
 | |
 | |
 | |
 | |
 | |
 | |
 |
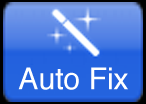 If the photo doesn't have any neutral areas, just tap the Auto Fix button to automatically correct the exposure.
|
Copyright ©2012-2013 FreshAir Software Inc. All rights reserved. |